
The MacBook Air is a popular choice among users who value portability and sleek design. However, one common concern for MacBook Air owners is the limited amount of RAM that comes with the device. While the base model may offer sufficient performance for everyday tasks, power users or those who engage in resource-intensive activities like video editing or gaming may find themselves needing more memory.
Fortunately, upgrading the RAM on a MacBook Air is possible and can significantly enhance its performance. Before diving into the upgrade process, it’s important to note that not all MacBook Air models have user-upgradable RAM. Apple began soldering RAM directly onto the logic board in some models, making it impossible to replace or upgrade. Therefore, it’s crucial to check if your specific MacBook Air model allows for RAM upgrades.
For those lucky enough to have a MacBook Air with upgradable RAM, the benefits of upgrading are numerous. Firstly, more RAM allows for smoother multitasking, enabling you to run multiple applications simultaneously without experiencing significant slowdowns. It also enhances overall system responsiveness by reducing lag and improving loading times.
To perform a RAM upgrade on your MacBook Air, you’ll need to follow these general steps:
- Research compatible RAM: Ensure you purchase RAM modules that are specifically designed for your MacBook Air model. Check Apple’s official website or consult reliable third-party sources to find compatible options.
- Gather necessary tools: You’ll typically need a small screwdriver set and an antistatic wristband (optional but recommended) to prevent any static electricity damage during installation.
- Prepare your workspace: Find a clean, well-lit area where you can comfortably work on your MacBook Air without distractions.
- Back up your data: Before attempting any hardware modifications, it’s always wise to back up your important files and data just in case anything goes wrong during the process.
- Power down and disconnect: Shut down your MacBook Air completely and unplug any connected cables, including the power adapter.
- Remove the back cover: Carefully remove the screws holding the back cover in place using the appropriate screwdriver. Keep track of each screw’s location as they may vary in size.
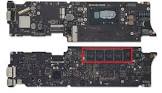
- Locate and replace RAM modules: Locate the existing RAM modules on your MacBook Air’s logic board. Gently release the retention clips on each side of the module to remove it. Insert the new RAM module(s) into the available slots, ensuring they are properly aligned and seated firmly.
- Reassemble and test: Carefully reattach the back cover, making sure all screws are securely fastened. Once everything is reassembled, power on your MacBook Air and check if it recognizes the upgraded RAM. You can verify this by going to “About This Mac” under the Apple menu and checking the system information.
It’s important to note that performing a RAM upgrade on your MacBook Air may void any existing warranty or AppleCare coverage you have. If you’re unsure about performing the upgrade yourself or want to preserve your warranty, it’s advisable to seek assistance from an authorized Apple service provider or a professional technician experienced in MacBook repairs.
In conclusion, upgrading the RAM on a MacBook Air can be a game-changer for those seeking improved performance and multitasking capabilities. However, it’s crucial to ensure that your specific model allows for user-upgradable RAM before proceeding with any modifications. With careful research, adequate preparation, and attention to detail during installation, you can enjoy a more powerful MacBook Air that meets your computing needs with ease.
7 Essential Tips for Upgrading the RAM in Your MacBook Air
- Research the model of your MacBook Air before attempting to upgrade the RAM. Different models have different RAM capacities and types, so you must know what type of RAM is compatible with your device.
- Purchase a memory module that is compatible with your specific MacBook Air model. Check the manufacturer’s website for information about which modules are compatible with your device.
- Make sure to purchase a high-quality memory module from a reputable seller or store. Cheap or counterfeit memory modules can cause damage to your laptop and void its warranty coverage.
- Before beginning, make sure you have all the necessary tools
- Disconnect all cables from the laptop and power it down completely before starting any work on it. This will prevent any accidental damage due to static electricity or other hazards.
- Follow instructions carefully when installing the new memory module; if done incorrectly, it could cause permanent damage to your laptop and void its warranty coverage as well as result in data loss or corruption of files stored on it..
- After installation is complete, check that everything works properly before putting the laptop back together again; if there are any issues, contact technical support for assistance in resolving them quickly and safely
Research the model of your MacBook Air before attempting to upgrade the RAM. Different models have different RAM capacities and types, so you must know what type of RAM is compatible with your device.
When it comes to upgrading the RAM on your MacBook Air, one crucial tip that cannot be emphasized enough is to thoroughly research your specific MacBook Air model before attempting any upgrades. Each MacBook Air model has its own RAM capacity and type, making it essential to know what kind of RAM is compatible with your device.
By taking the time to research your MacBook Air model, you can ensure that you purchase the correct type and capacity of RAM for a successful upgrade. Installing incompatible RAM can lead to various issues, including system instability, crashes, or even permanent damage to your device.
To start your research, visit Apple’s official website or consult reliable third-party sources that provide detailed specifications for different MacBook Air models. Look for information regarding the maximum supported RAM capacity and the specific type of RAM required for your model.
Once you have identified the compatible RAM type and capacity for your MacBook Air, make sure to purchase from reputable sources or authorized retailers. This ensures that you receive genuine and reliable memory modules that will work seamlessly with your device.
Remember, investing time in thorough research will save you from potential headaches down the line. It’s always better to be well-informed about your device’s capabilities and limitations before proceeding with any upgrades.
In conclusion, researching the model of your MacBook Air before attempting a RAM upgrade is an essential tip. Knowing the specific RAM capacity and type required for your device ensures a smooth and successful upgrade process. By doing so, you can maximize the performance of your MacBook Air and enjoy a more efficient computing experience.
Purchase a memory module that is compatible with your specific MacBook Air model. Check the manufacturer’s website for information about which modules are compatible with your device.
When it comes to upgrading the RAM on your MacBook Air, one crucial tip to keep in mind is to purchase a memory module that is compatible with your specific model. This step ensures a smooth and successful upgrade process, allowing you to maximize the performance of your device.
To determine which memory modules are compatible with your MacBook Air, it’s essential to check the manufacturer’s website or consult reliable sources for accurate information. Apple’s official website provides detailed specifications and compatibility details for each MacBook Air model, making it an excellent resource for finding compatible RAM modules.
By visiting the manufacturer’s website, you can find information about the type, speed, and capacity of RAM modules that are supported by your MacBook Air. It’s important to note that different models may have varying requirements, so be sure to select a module that matches your specific device.
Purchasing a compatible memory module ensures that it will fit seamlessly into your MacBook Air without any compatibility issues. It also guarantees optimal performance and stability once the upgrade is complete. Installing incompatible RAM can lead to various problems such as system instability, crashes, or even damage to your device.
To summarize, before embarking on a RAM upgrade for your MacBook Air, take the time to research and identify the compatible memory modules for your specific model. By checking the manufacturer’s website or consulting reliable sources, you can ensure a successful upgrade process and enjoy improved performance on your MacBook Air without any compatibility concerns.
Make sure to purchase a high-quality memory module from a reputable seller or store. Cheap or counterfeit memory modules can cause damage to your laptop and void its warranty coverage.
When it comes to upgrading the RAM on your MacBook Air, one crucial tip to keep in mind is to always purchase a high-quality memory module from a reputable seller or store. While it may be tempting to opt for cheaper alternatives or deals that seem too good to pass up, doing so can have serious consequences for your laptop.
Cheap or counterfeit memory modules may not meet the necessary quality standards and can potentially cause damage to your MacBook Air. These modules might not undergo rigorous testing or adhere to the same specifications as genuine ones, leading to compatibility issues, system instability, and even permanent damage to your device.
Moreover, using non-genuine RAM modules can void your MacBook Air’s warranty coverage. Apple explicitly states that any unauthorized modifications or repairs could nullify the warranty, leaving you responsible for any future repairs or replacements.
To ensure a smooth and reliable upgrade process while protecting your investment, it’s crucial to purchase memory modules from reputable sellers or authorized retailers. These sources offer genuine products that are specifically designed and tested for compatibility with your MacBook Air model.
Reputable sellers often provide warranties on their RAM modules, giving you peace of mind in case of any unforeseen issues. Additionally, they typically have knowledgeable customer support teams who can assist you with any questions or concerns during the purchasing process.
When searching for a reliable seller, consider checking official Apple resellers, well-established electronics stores, or reputable online retailers with positive customer reviews and ratings. By doing so, you can minimize the risk of encountering counterfeit or subpar memory modules that could potentially harm your MacBook Air.
Remember, investing in a high-quality RAM module from a trusted source not only ensures optimal performance but also safeguards your device’s longevity and warranty coverage. So when upgrading the RAM on your MacBook Air, prioritize quality over affordability and choose wisely for a seamless and worry-free experience.
Before beginning, make sure you have all the necessary tools
Before embarking on a MacBook Air RAM upgrade, it’s essential to ensure that you have all the necessary tools at your disposal. Having the right tools not only makes the process smoother but also minimizes the risk of damaging your device during the upgrade.
Here are some tools you should gather before starting your MacBook Air RAM upgrade:
- Screwdriver set: MacBook Air models typically require small Phillips or Torx screwdrivers to remove the back cover. Make sure you have a set that includes these sizes to avoid any frustration or potential damage caused by using incorrect tools.
- Antistatic wristband (optional): While not mandatory, an antistatic wristband can be beneficial in preventing static electricity discharge during the upgrade process. This extra precaution helps safeguard delicate internal components from potential damage.
- Clean workspace: Find a clean, well-lit area where you can comfortably work on your MacBook Air without any distractions. A clutter-free workspace reduces the chances of losing screws or misplacing important components.
By gathering these essential tools beforehand, you’ll be well-prepared to tackle your MacBook Air RAM upgrade with confidence and precision. Remember to exercise caution and refer to appropriate guides or tutorials specific to your MacBook Air model for step-by-step instructions.
With the right tools and careful execution, you’ll be on your way to enhancing your MacBook Air’s performance through a successful RAM upgrade.
Disconnect all cables from the laptop and power it down completely before starting any work on it. This will prevent any accidental damage due to static electricity or other hazards.
When it comes to upgrading the RAM on your MacBook Air, one crucial tip that should never be overlooked is disconnecting all cables and powering down the laptop completely before starting any work. This simple precautionary step can save you from potential accidents and damage.
Why is it important to disconnect all cables and power down your MacBook Air? Well, when you’re working on electronic devices, especially delicate ones like laptops, there’s always a risk of static electricity buildup. This static charge can potentially harm sensitive components inside your MacBook Air, including the RAM modules you’re about to upgrade.
By disconnecting all cables, including the power adapter and any peripherals, you eliminate the risk of accidental electrical discharge while working on your laptop. This ensures that no sudden surge of electricity damages any internal components or disrupts the RAM upgrade process.
Additionally, powering down your MacBook Air completely serves as an extra layer of protection. When the laptop is turned off, it reduces the chances of encountering any unexpected errors or glitches during the RAM upgrade. It also minimizes any potential risks associated with handling live electrical circuits.
To follow this tip effectively, make sure to shut down your MacBook Air properly by going to the Apple menu and selecting “Shut Down.” Once it has powered off completely, unplug all cables from their respective ports.
Remember, taking these precautionary measures only takes a few extra moments but can save you from costly mistakes or irreversible damage. So before starting any work on your MacBook Air’s RAM upgrade journey, always remember to disconnect all cables and power down your laptop completely. Your MacBook Air will thank you for it!
Follow instructions carefully when installing the new memory module; if done incorrectly, it could cause permanent damage to your laptop and void its warranty coverage as well as result in data loss or corruption of files stored on it..
When it comes to upgrading the RAM on your MacBook Air, following instructions carefully is of utmost importance. Installing a new memory module incorrectly can have serious consequences, including permanent damage to your laptop and voiding its warranty coverage. Additionally, it can result in data loss or corruption of files stored on your device.
To ensure a successful RAM upgrade without any mishaps, it’s crucial to pay close attention to the provided instructions. Here are a few key points to keep in mind:
- Research and verify: Make sure you have the correct RAM module that is compatible with your specific MacBook Air model. Double-check the specifications and ensure it matches the requirements outlined in the instructions.
- Take precautions: Before starting the installation process, take necessary precautions such as grounding yourself to prevent any static electricity damage. Using an antistatic wristband can help discharge any static buildup and protect delicate internal components.
- Read step-by-step: Carefully read through each step of the installation instructions before proceeding. Familiarize yourself with the process, ensuring you understand how to properly handle and insert the new memory module.
- Gentle handling: Handle both the existing RAM module and new one with care. Avoid applying excessive force or bending any components during installation.
- Align correctly: When inserting the new memory module, ensure it is properly aligned with the slot on your MacBook Air’s logic board. Insert it gently but firmly until it is securely seated in place.
- Double-check connections: After installing the new memory module, double-check that all connections are secure before reassembling your MacBook Air.
By following these instructions meticulously, you can greatly reduce the risk of causing harm to your laptop or compromising its warranty coverage. It’s always better to be cautious and take your time during this process to avoid any potential issues down the line.
If you feel unsure about performing a RAM upgrade yourself or are concerned about potential risks, seeking assistance from an authorized Apple service provider or a professional technician is a wise decision. They have the expertise and experience to handle such upgrades safely and efficiently, ensuring the integrity of your MacBook Air and its warranty coverage.
Remember, a RAM upgrade can significantly enhance your MacBook Air’s performance, but it’s essential to proceed with caution to protect your investment and valuable data.
After installation is complete, check that everything works properly before putting the laptop back together again; if there are any issues, contact technical support for assistance in resolving them quickly and safely
After successfully upgrading the RAM on your MacBook Air, it’s essential to ensure that everything is functioning correctly before reassembling the laptop. This final step is crucial in identifying any potential issues and addressing them promptly and safely.
Once you have installed the new RAM modules, take a moment to power on your MacBook Air and check for any signs of abnormal behavior. Pay close attention to the startup process, system responsiveness, and overall performance. Ensure that the upgraded RAM is being recognized by your MacBook Air’s operating system.
To verify if the RAM upgrade was successful, navigate to “About This Mac” under the Apple menu. Here, you can find detailed information about your MacBook Air’s hardware configuration, including the newly installed RAM capacity. If everything looks as expected and your MacBook Air is running smoothly without any noticeable problems or errors, congratulations! You’ve successfully completed the RAM upgrade.
However, if you encounter any issues during this testing phase, it’s essential not to panic. Contacting technical support can be immensely helpful in resolving these problems quickly and safely. Reach out to Apple support or an authorized service provider for guidance tailored specifically to your situation.
Technical support professionals are equipped with extensive knowledge and expertise in addressing hardware-related issues. They can assist you in troubleshooting any potential compatibility problems or installation errors that may have occurred during the RAM upgrade process. By seeking their assistance promptly, you can ensure that any issues are resolved efficiently without risking further damage to your MacBook Air.
Remember, it’s always better to seek professional assistance when encountering technical difficulties rather than attempting risky DIY fixes that could potentially worsen the problem.
In conclusion, after completing a RAM upgrade on your MacBook Air, it is crucial to thoroughly test its functionality before reassembling the laptop. Checking for proper operation ensures that you can enjoy the benefits of increased memory capacity without encountering unexpected complications. If any issues arise during this testing phase, don’t hesitate to reach out to technical support for expert guidance and assistance. With their help, you can resolve any problems quickly and safely, ensuring a smooth and successful RAM upgrade experience.
Tags: base model, concern, device, everyday tasks, gaming, limited amount of ram, macbook air, macbook air models, macbook air ram upgrade, memoryupgrading ram, multiple applications simultaneously, owners, performance, portability, power users, replace or upgrade rambenefits of upgrading ram, resource-intensive activities, sleek design, slowdowns, smoother multitasking, soldering ram directly onto the logic board, user-upgradable ram, users, video editing