
MacBook Pro Mid 2012 RAM Upgrade Guide
If you own a MacBook Pro Mid 2012 model and are looking to boost its performance, upgrading the RAM is a great way to do so. Adding more RAM can help your MacBook Pro run smoother and faster, especially when running multiple applications or tasks simultaneously.
Here are the steps to upgrade the RAM on your MacBook Pro Mid 2012:
- Check Compatibility: Make sure to purchase compatible RAM for your MacBook Pro. The Mid 2012 model supports DDR3 PC3-12800 (1600 MHz) RAM modules.
- Gather Tools: You will need a Phillips screwdriver and an anti-static wrist strap to prevent damage from static electricity.
- Prepare Your MacBook Pro: Turn off your MacBook Pro, unplug all cables, and lay it on a soft surface with the bottom facing up.
- Remove Bottom Cover: Unscrew the screws on the bottom cover of your MacBook Pro using a Phillips screwdriver. Carefully remove the cover to access the internal components.
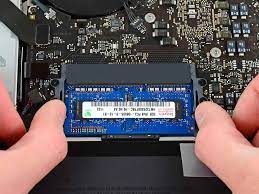
- Locate Existing RAM Modules: Identify the existing RAM modules in your MacBook Pro. They are located in slots on the logic board.
- Remove Existing RAM Modules: Gently spread apart the retaining clips on each side of the existing RAM module until it pops up. Carefully remove it from its slot.
- Install New RAM Modules: Align the notch on the new RAM module with the notch in the slot and slide it in at an angle. Press down until you hear a click, indicating that it is securely in place.
- Replace Bottom Cover: Put back the bottom cover of your MacBook Pro and tighten all screws securely.
- Power On Your MacBook Pro: Turn on your MacBook Pro and check if it recognizes the new RAM by going to “About This Mac” under the Apple menu.
Congratulations! You have successfully upgraded the RAM on your MacBook Pro Mid 2012. Enjoy improved performance and multitasking capabilities with your upgraded memory!
7 Essential Tips for Upgrading RAM in Your Mid-2012 MacBook Pro: A Compatibility and Installation Guide
- Ensure the RAM you purchase is compatible with MacBook Pro mid 2012 model.
- Refer to the user manual or online guides for step-by-step instructions on how to upgrade RAM.
- Power off the MacBook Pro and disconnect all cables before starting the RAM upgrade process.
- Use proper tools, such as a screwdriver, to open the MacBook Pro and access the RAM slots.
- Handle the RAM modules carefully by their edges to avoid damage from static electricity.
- Make sure to seat the new RAM modules correctly in the slots and secure them in place before closing up your MacBook Pro.
- After upgrading RAM, power on your MacBook Pro and check system settings to ensure it recognizes the new memory capacity.
Ensure the RAM you purchase is compatible with MacBook Pro mid 2012 model.
When considering a RAM upgrade for your MacBook Pro Mid 2012 model, it is crucial to ensure that the RAM you purchase is fully compatible with your device. Choosing the correct type and specifications of RAM, such as DDR3 PC3-12800 (1600 MHz) modules, will guarantee smooth installation and optimal performance. By verifying compatibility beforehand, you can avoid potential issues and maximize the benefits of upgrading your MacBook Pro’s RAM.
Refer to the user manual or online guides for step-by-step instructions on how to upgrade RAM.
For a successful RAM upgrade on your MacBook Pro Mid 2012, it is highly recommended to refer to the user manual or online guides for detailed, step-by-step instructions. These resources provide valuable guidance on the proper procedure to follow during the upgrade process, ensuring that you handle the components correctly and avoid any potential issues. By consulting the user manual or online guides, you can confidently navigate through each step of the RAM upgrade with ease and precision, leading to a smooth and efficient enhancement of your MacBook Pro’s performance.
Power off the MacBook Pro and disconnect all cables before starting the RAM upgrade process.
Before embarking on the RAM upgrade process for your MacBook Pro Mid 2012, it is crucial to power off the device and disconnect all cables. This simple yet essential step ensures the safety of both you and your MacBook Pro during the upgrade process. By powering off the device and removing all cables, you minimize the risk of electrical shock or damage to internal components. Taking this precaution sets a solid foundation for a smooth and successful RAM upgrade experience, allowing you to enhance your MacBook Pro’s performance with peace of mind.
Use proper tools, such as a screwdriver, to open the MacBook Pro and access the RAM slots.
To ensure a successful RAM upgrade on your MacBook Pro Mid 2012, it is essential to use the proper tools, such as a screwdriver, to open the laptop and access the RAM slots. Using the correct tools will help you safely remove the bottom cover and handle the internal components with care. By using a screwdriver, you can easily unscrew the necessary screws without causing any damage to your MacBook Pro, allowing you to seamlessly access and upgrade the RAM slots for improved performance.
Handle the RAM modules carefully by their edges to avoid damage from static electricity.
When upgrading the RAM on your MacBook Pro Mid 2012, it is crucial to handle the RAM modules with care by their edges to prevent damage from static electricity. Static electricity can potentially harm the sensitive components of the RAM modules, leading to performance issues or even permanent damage. By holding the RAM modules only by their edges, you can minimize the risk of static discharge and ensure a successful and safe upgrade process for your MacBook Pro.
Make sure to seat the new RAM modules correctly in the slots and secure them in place before closing up your MacBook Pro.
When upgrading the RAM on your MacBook Pro Mid 2012, it is crucial to ensure that the new RAM modules are seated correctly in the slots and securely in place before closing up your laptop. Properly aligning and securing the RAM modules will prevent any potential issues with connectivity and ensure optimal performance once the upgrade is complete. Taking the time to double-check that the new RAM is properly installed will help avoid any complications and allow you to enjoy the benefits of increased memory capacity without any hiccups.
After upgrading RAM, power on your MacBook Pro and check system settings to ensure it recognizes the new memory capacity.
After completing the RAM upgrade on your MacBook Pro Mid 2012, it is essential to power on your device and navigate to the system settings to verify that the new memory capacity is recognized. By checking this crucial step, you can confirm that the upgrade was successful and that your MacBook Pro is now utilizing the additional RAM for improved performance. This simple verification process ensures that your device is running optimally with the enhanced memory capacity, allowing you to enjoy a smoother and more efficient computing experience.
Tags: compatibility, ddr3 pc3-12800 1600 mhz, disconnect cables, installation, instructions, macbook pro mid 2012, macbook pro mid 2012 ram upgrade, online guides, performance, power off, ram upgrade, user manual